Feeds:
Posts
Comments

Archive for the ‘Tuesdays with Dorrie’ Category

There are few things I love more than gingerbread. Since I’m not much of a “dessert person,” the savory part of me loves the rebellious combination of spicy ginger and black pepper with sugar and molasses. For me, this is dessert, perfected, and I was thrilled to see it come up as this week’s TWD baking assignment.

gingerbread

There are about a million different ways to make gingerbread, each with varying degrees and combination of spice. This recipe was very straight-forward, focusing on the simple ginger flavor, using ground and fresh ginger and a bit of black pepper to boost the heat. Then there were two unexpected additions: instant espresso and cocoa powder. I was surprised to be including these ingredients, but each provided a pleasant bitterness and grounded what could have been a too-sweet recipe. (check out the full recipe here)

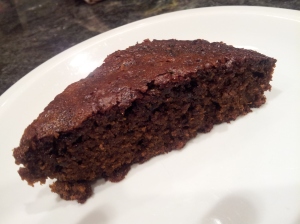
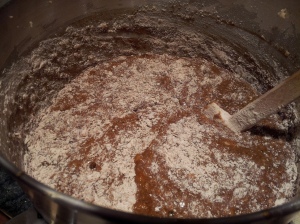
I love how easy this batter comes together — a quick mix of wet and dry ingredients and you are on your way to the oven. Don’t worry if your batter is lumpy — that’s normal and lends to an airy cake in the end.  I decided to make mine into one 9-inch cake but if I were serving it at a party, I would do mini cakes for sure so that every got an equal amount of crispy-cake-edge and moist-sticky-cake-inside.  Either way, this is such a simple cake and should definitely be your dessert staple this holiday season. It’s full of winter spices, makes your house smell amazing and tastes perfect paired with a mug of hot apple cider (with or without a splash of bourbon).

gingerbread - batter

In the end this cake had a lovely sharp bite — the combination of the spicy and bitter ingredients made for a very “grown-up” gingerbread. Perhaps a challenge for someone expecting a very sweet and only slightly gingery cake, but I loved it. Next time I would add a bit of cinnamon, a pinch of nutmeg and a pinch of cardamom to give a bit more depth to the spicy flavor….but mostly because I look for any excuse to add cinnamon and cardamom to desserts.

While the cake is delicious on it’s own, it begs for a bit of something creamy on top to cut through the spice. My favorite choice: some Greek yogurt flavored with a bit of honey and lemon zest. Gingerbread AND Greek yogurt — now I’ve got two of my favorite things on one plate. Life is good 🙂

Happy Holidays!


Read Full Post »

This is the kind of recipe that gives you faith in yourself as a baker, that makes you feel confident and sure in the kitchen and officially puts you in the camp of people who “just whip up a little something” when friends come over for Brunch. And thank goodness it is, because after last month’s bagel experiment, I was questioning whether I would continue with TWD. But then I remembered that this is a journey, that I’m becoming a better baker and that if I can throw together something as delicious and easy as these Buttermilk Crumb Muffins I must be doing something right (go here for the full recipe).

You have to love a recipe that requires nothing more than a bowl, a spoon and a baking pan. Usually I wouldn’t be able to restrain my impulse to tinker with a new recipe, adding a bit of this and a little of that. But this time I was in the midst of a busy week and was so happy to see this simple recipe that I made it to the letter and couldn’t have been happier.

Despite it’s ease, this recipe has some really smart take-away lessons:

(1.) Pull back some of the dry mixture to use as a crumble topping — it’s the best part and I love the idea that I don’t have to make a separate crumble topping.

(2.) When you are making muffins and don’t have enough batter to fill all the tins, fill any empty muffin tin 1/2 way up with water so that you whole pan cooks evenly. Brilliant!!

(3.) Although this recipe calls only for shortening and the muffins turned out light and crumbly as a result, I think they could have used the flavor boost of butter or olive oil. I find most all-shortening baked good recipes to be a bit bland and prefer to swap out at least some of the shortening with butter or olive oil whenever possible — both of these full-flavor fats lend to more complex flavors in the finished product.

Speaking of next time, although these muffins were light and tasty and the perfect simple treat in a busy work week, I will certainly make some additions in the future. Perhaps dried cherries and toasted almonds, or diced pear and ground cardamom, or chopped banana chips and bittersweet chocolate….the possibilities are endless….I think these are going to be a new staple on our brunch catering menu.

Read Full Post »

I love it when my kitchen is granted a moment of culinary serendipity. Like when you realize you have a bundle of tomatoes nearly too ripe AND the cilantro & lime needed to turn them into a quick salsa. Or when you have some leftover mashed potatoes AND you discover that last bit of ground beef in the freezer perfect for assembling a shepard’s pie. Or what happened this past week: I’d reached a stone fruit breaking point with over 6 lbs of assorted plums from the last few weeks of Farm Box deliveries threatening to take over my crisper drawer AND realized that this week’s TWD baking assignment was a basic whole wheat bread. Fresh baked bread was the only excuse I needed to turn all those plums into a huge batch of jam. A match made in heaven.

First, the jam. I used this recipe as my base — I like the method of cooking half of the fruit in a sugar syrup until soft and then adding the rest of the fruit. This leaves you with a lovely textured jam with bits of chunky fruit and bits of mashed fruit. I ended up combining three different varieties of plums with a basket of blueberries. And then, for a little twist, one lonely star anise pod — it may seem like a small, insignificant addition, but this tiny flavor bomb adds a complex “black liquorice” taste that blends so nicely with the plum’s acidity.

Once I had a huge pot of jam, it was time for the bread. The recipe (found here and here) is so, so easy. A few simple ingredients (whole wheat flour, bread flour, yeast, honey, salt and water) are combined, kneaded and left to rise. After a second rise in loaf pans, they’re ready for the oven. With about 2 hours of unattended rise time, this recipe does require some forethought — but ultimately  it’s very little actual work and such a simple endeavor. Within 5 minutes of the bread hitting the oven, my house smelled like a bakery — the smell alone is reason to bake bread more often. Is there anyone who doesn’t associate the smell of fresh-baked bread with happiness? It’s truly one of my favorite smells.

I let the bread rest as long as I could stand (about 22 minutes I think) and then carved off a slice and sat down to warm bread and homemade jam. The bread was truly the perfect bread for toast and sandwiches — a light crumb, a faint sweetness from the honey and not too heavy. The jam was sweet but not too sweet thanks to the tartness of the plums and a savory backbone provided by the star anise. Has anyone come up with a carb-only diet yet? I think I need to start one because I could eat this every day!

Read Full Post »

To me, there is nothing better to do with summer fruit that fold it up into a delicious pastry crust. While the pie from my past post was pretty spectacular, it does take some time to make. The chilling of the dough and chilling of the pie are key parts to the success. So when patience is not on my side and I have an abundance of fruit in the house and I’m craving that perfect summer dessert, I turn to pie’s less-fussy, easier cousin, the galette. These free-form, open-faced tarts can be filled with nearly anything — some fruit with a bit of sugar, some cheese bound with a bit of egg.

I’ve made galettes with a variety of different doughs and was excited to try this week’s Tuesdays with Dorrie’s baking assignment. The recipe called for a mix of flour and cornmeal (a nice addition for a bit of texture) and a mix of butter and yogurt (another nice addition for a bit of tang). The biggest difference between a pie dough and a galette dough is the way it’s handled. Pie dough should have big steaks of butter/shortening in it and should not be overworked — this ensures a flaky crust, the hallmark of any good pie. Galette dough, on the other hand, should have the fat worked completely into the flour(s), creating a more sturdy dough with a crumbly instead of a flaky texture. This is good news for the speedy baker — it means making galette dough in a food processor is a great choice….your dough will be ready in minutes!

We stayed true to the recipe and filled this one with a mix of seasonal berries, added just a bit of sugar and honey, folded up the edges and in a short 35 minutes we had this lovely, golden galette.


This week I got a hug batch of plums in my Farm Box. I think a feel a plum and almond paste galette coming on….

Visit this week’s hosts for the full recipe: The Kitchen Lioness and Tomato Thymes.

Read Full Post »

It seemed so simple starting out. I read through the recipe for French Strawberry Cake in Baking with Julia — this week’s assignment from TWD — and it was very straightforward. Bake a basic genoise cake, fill with berries and cream, frost with more cream and top with gorgeous whole strawberries. A grown up strawberry shortcake. I was all in. I reviewed the genoise cake recipe and got started — a simple cake leavened with eggs — how hard could it be? This is probably a good time to admit that even though I spend my days developing recipes and cooking for people  I am very much a hit-or-miss baker. And when it comes to cakes, it’s usually a miss. Maybe it’s the precision required in measuring the perfect cup of flour or maybe it’s the patience required in waiting for cakes to cool, but I’ve made very few successful cakes in my 18+ years of professional cooking. In fact I can count them on one hand. Despite these past failures, I went into this recipe full of optimism. Frankly, it just didn’t seem that hard.

So I sifted the flour, separated the eggs and whipped the mixture for the full 5 minutes until I had pretty lemon-yellow ribbons of batter. I folded in the butter, poured the mixture into a round cake pan and sent it off to the oven to bake. A mere 22 minutes later I had what seemed like a successful cake — the tester came out clean so I let it cool, wrapped it up and refrigerated it overnight.

But, to be honest, I knew something was amiss. Before refrigerating it, I noticed that the cake was awfully thin still — it had barely risen and was only an inch tall at best. The top of the cake was also very sticky. In my optimistic ignorance, I thought it would be fine after it cooled. Not so much. I decided to turn the cake into two rectangles to create some extra layers — I thought it would be fun to make a small rectangle cake instead of the expected round shape. To do this, I cut the round edges into straight lines, cut the cake into two even rectangles and that’s when I noticed something was very wrong.

The cake was rubbery and had a thin, gummy layer in the middle. In fact, everything about the texture was wrong: the top was spongy and super sticky, the middle was gummy and the bottom might as well have been the bottom of a shoe. One taste dashed any hopes I had of saving this cake — it was utterly inedible. The worst part? I have no idea why! Clearly I did something wrong with the eggs since they were solely responsible for making this cake rise. Did I whip the too long or not long enough? And why did the cake separate like that?  I’m hoping the other more seasoned bakers of TWD can explain the error of my ways. Part of me wants to give it another go and get it right. Part of me is thinking “What’s so great about cakes anyway?” Either way, I need some answers to have closure. Help!

In the meantime I ate the pain of my failure with a bowl of whipped cream and strawberries — nearly enough to make me feel better. But seeing as I’m two days late with this post, I was clearly still working through some feelings of shame. Whipped cream and berries only have so much power after all. If you’d like to try making this cake yourself, go to this week’s hosts for the full recipe — Sophia’s Sweets and Think, Love, Sleep, Dine — if you do better than I did (and I can’t imagine anyone doing worse), tell us about your success — I need pictures of what I should aspire to 🙂

Read Full Post »

We’re back with another Tuesdays with Dorrie  baking post from Baking with Julia. (Sadly, today is Wednesday and this post is a day late due to some technical difficulties, but better late than never!) This time, in honor of St. Patty’s Day, we made a simple, humble Irish Soda Bread. This is one of those basic recipes that every home cook can master. With only four ingredients that you’re likely to have on hand and no equipment beyond a wooden spoon, Irish Soda Bread is perfect for putting the “wow” factor in a simple weeknight dinner of soup and salad.

This recipe is really a kind of “mother” recipe – a base set of ingredients and instructions that you can modify and change with endless interpretation. (Our official TWD hosts this week are My Culinary Mission and Chocolate Moosey – check them out for the full recipe.) At its heart, this recipe is a kind of over-grown biscuit, leavened with baking soda alone. The difference is that there is very little fat in it, which makes it delicious straight out of the oven but NOT the next morning – by then it may as well be a door-stopper. Because of the small about of fat, many people make a savory version stirring in a bit of cheese – maybe some really good Irish cheddar to stick with tradition? For my version, I decided to keep it sweet and added 3 tablespoons of honey, 1/2 cup of dried blueberries and 1 tablespoon of lemon zest to the recipe. The result was a lovely, berry-flecked bread perfumed with lemon. Slathered with butter, it was the perfect breakfast for. St. Paddy’s Day.

The two tips I can offer to make a stellar soda bread is (A) don’t over-mix — just fold the ingredients together and dump onto a pan. And (B) don’t over-bake. Error on the side of under-baked and pull from the oven when it’s JUST baked through. This bread can easily go from lovely to dense but these two tips will help prevent that. Also, try changing up the flour. I did a mix of oat flour (rolled oats pulsed in my food processor until finely ground) and unbleached all-purpose flour – the taste and texture was chewy, complex and wonderful.

We make a version of this bread in our Kids’ Cooking Classes and Camps — it’s such a simple one that even the little ones can help. And what a sense of accomplishment making homemade bread at age 7!! Hope you (and yours) try this one at home. Happy baking!


Read Full Post »

We recently joined the Tuesdays with Dorrie baking/blogging club and are up to our elbows in flour already! The club is a fun way to bake through one of Dorrie Greespan’s books with a bunch of other bakers and share your baking stories. I was excited to join because I may cook for a living but I am hardly a profession baker…baking takes a certain kind of patience I am usually lacking. So what better way to work on my baking skills (and my patience) than baking some delicious recipes and sharing my experience. For this round of TWD, we’re baking from Dorrie’s newest book, Baking with Julia — a book full of the spirit of Julia Child, recipes from some amazing bakers and countless pages of culinary inspiration. As members of TWD, we bake twice a month and share our experience with our online community. This week’s assignment: Rugelach…you know, those sugary rolled cookies stuffed with fruit and cinnamon and nuts.

Our two official TWD hosts this week are My Baking Heart and The Urban Hiker — go to their blogs to find the full recipe. In the meantime, here’s how this recipe went for me:

First, although I’ve made rugelach before many times, using the same basic formula that this recipes offers, I think these are the best rugelach I’ve ever made. The reason? A little thing called “lekvar,” which I admit I has no idea about until reading this recipe. Lekvar is a dried fruit puree — in this case, dried apricots that are softened and blended with sugar and amaretto — that is miles more delicious than the store-bought jam I’ve been using for years to make these cookies. It’s more dense and rich than jam…all I could do to not eat the whole bowl with a spoon. An extra step for this recipe, yes, but well worth it.

After I made the lekvar, I let it cool while I gathered the rest of the ingredients used to fill the cookies including nuts, fruit and a cinnamon sugar mixture. The recipe leaves the choice of nuts and fruits to you — I choose toasted hazelnuts and dried cherries.

Then came time to roll the dough (a simple cream cheese & butter dough), which was easy enough, and top it with the lekvar, sugar, nuts and cherries. Sure enough, I got a little over-ambitious with the filling and rolling them was a challenge — it’s just so tempting to over-fill! I ended up using some plastic wrap to help things along and soon enough had logs of dough encasing lots of lovely bits. Off the fridge for 3 hours to get nicely chilled. Then each log got egg-washed and cut into 1-inch pieces (the trick here is to use a serrated knife, by the way.) Then each piece got tossed in  a cinnamon-sugar-ground hazelnut mixture and baking until golden on top and caramelized on the bottom. Soon my house smelled like a Russian bakery!

They were delicious 15 minutes of out of the oven although I can see how they would stay light and flaky for days. I decided to freeze two of the logs and pull them out next week to cut and bake and bring to a potluck dinner — a girl can only eat so many cookies!

All in all, I loved making these — we may have to add them to a cooking class menu. Meanwhile, I’m getting ready for our next baking assignment for March 20th: Irish Soda Bread.

Read Full Post »